LEVEL 1 - Junior Pro

Welcome to Level 1 of the Strategy Series!

It’s important knowing the technique of the game, but learning the strategy of the game is how we win!

If there were two equally skilled teams, of equal fitness playing against each other.

The team who has the best strategy and execution of that strategy, will win.

In its simplest form, cricket is about scoring the most runs to win.

If we bat first, we must post a total that the opposition can’t chase down.

And if we bat second, we must chase the opposition’s total before the overs run out.

We will look at the different strategies used to try and score runs (as batters).

And how we limit runs being scored (as bowlers/fielders).

Work your way down the different topics.

Remember, you’ll need to answer the assessment at the end to show what you’ve learnt!

Feel free to refer back to information whenever you need, good luck.

Introduction

As a cricketer, knowing the fielding positions can be very helpful as a:

– Bowler (Eg. To set your own field)

– Batter (Eg. ‘Try to hit that gap between square leg and mid wicket)

– Fielder (Eg. So you know where to go and stand in the field)

– Captain (Eg. ‘Can you go to mid off please’)

Firstly, you have the OFF SIDE and the LEG SIDE.

OFF SIDE – is the half of the field the batter’s CHEST is pointing towards in their stance.

LEG SIDE is the half of the field the batter’s BACK is pointing towards in their stance.

Secondly, you have fielders at different distances away from the batter.

Close Catchers – who are near to the batter and are ready to take flat reaction catches.

In/Ring Fielders – who are placed slightly further away, with the primary objective of stopping a single.

Boundary Fielders – who are pushed out to the boundary rope, to stop boundaries.

So let’s look at the different fielding positions on the cricket field, and see what attributes are needed.

All these fielding positions are for a Right-Handed batter, it will be a mirror image for a Left-Handed batter.

*Note vertical guide line – off/leg side | horizontal guide lines – stump line*

close catchers

Attributes of a Close Catcher:
– Quick reactions
– Good catcher
– Excellent agility left and right

In/Ring Fielders

Attributes of a Inner/Ring Fielder:
– Quick mover left & right
– Good high/flat catcher
– Accurate throwing arm

boundary Fielders

Attributes of a Boundary Fielder:
– Quick runner
– Good high catcher
– Accurate & powerful throwing arm

So have a think what your strengths are, and work out the best place for you to field.

If you’re a quick runner, then being a boundary fielder is great as you can cover ground fast to stop the ball going over the boundary.

Or, if you have good agility moving left and right, and are good at diving, then get yourself in at Point, Cover, Mid Wicket, as these are important fielding positions.

The amazing thing about a cricket game is that it ebbs and flows constantly.

The game can change so quickly.

The opposition could be scoring runs easily, and we take 2 quick wickets, and the momentum swings in our direction.

This is why the classic question of ‘who’s winning?’ is hard to answer.

We can tell if a team is in a winning position or whether the game is in the balance (meaning it could go either way).

So, at any moment during the game, we need to able to read the situation of the game.

This information then dictates what is needed from us at the moment in time.

In order to help win the game.

In its simplest form, we either need to ATTACK or DEFEND.

This applies to batting, bowling and setting the field.

ATTACK:

So what does it mean to attack?

This means we apply maximum pressure on the opposition to move closer to winning the game.

For example:

– The opposition are 20/3, so we set a field with catchers and close fielders to draw their new batter into playing a high-risk shot and take another wicket.

– The opposition batters have built a partnership, so we bring our best bowler back on to try to take a wicket.

– We’re batting well, and the opposition’s weakest bowler comes on to bowl, so we try to hit boundaries to put the bowler under pressure.

DEFEND:

If attacking means we apply maximum pressure on the opposition, defending is what’s needed on the receiving end.

This is when we need to absorb the pressure, and try to regain control.

For example:

– You walk out to bat and the score is 10/2, the opposition are loud and in your face, you need to try to build a partnership and not lose another wicket for a couple of overs.

– The opposition batter’s are batting very well and scoring freely, so we put some boundary fielders out to stop the flow of runs and lower the scoring rate.

When you’re in the heat of battle, try to take a second to assess the situation of the game.

So first we need to work out – ‘are we in control of the game?’

Examples:

There’s been two wickets in two balls. You need to absorb some pressure and not lose another wicket for 2 overs.

The opposition batters are scoring freely. We set an off side field and bowl wide outside off stump to try bowl dot balls.

The team need 30 to win off 18 balls and there’s 7 wickets in hand. We attack as we need 10 runs per over and have 7 wickets remaining.

The partnership of two well set batters has been broken. We attack the new batter to try and take another wicket.

Remember, the aim of batting is to score runs.

Sure, we can achieve this by hitting fours (where the ball bounces before crossing the boundary line) and sixes (where the ball carries over the boundary line without bouncing).

But, if we can’t hit 4’s/6’s, we must run up and down the length of the pitch to score runs.

If the bowler’s are good (meaning they don’t bowl many bad balls to be able to hit for 4/6), then getting:

– Singles (1 run)

– 2’s (2 runs)

– 3’s (3 runs)

These are important for keeping the scoreboard moving and not facing dot balls (where no runs are scored).

At each end of the pitch you have the ‘Popping Crease’, which is the line in front of the stumps.

This is important when running, as your bat MUST touch behind (area closest to the stumps) the crease for the run to be completed.

If your bat does not touch the area behind the line then the run will not count, and the umpire will signal ‘ONE SHORT’.

On the line does not count, you must be over!

The image below shows the popping crease and the batter sliding their bat over the line (even though this was controversially called ‘One Short’!).

If you can run well (run quickly and make good judgments), then this really irritates bowlers and the opposition.

For example:

If you drop the ball by your feet as a batter and run.

And do this a couple of times.

The fielders will naturally come stand closer to try and stop the run from being completed.

This gives you an easier opportunity to hit the ball pass the fielders.

Or hit the ball over them to help score more runs (be it 2/3/4/6).

Putting fielders under pressure (by calling loud and running hard) can cause miss fields/fumbles.

This gives you more time to complete the run.

To turn quickly, make sure you:

– Get low with your body (you can put your hand on the ground to help stay balanced)

– Fully stretch your arm out with your bat to maximise your reach

When you turn, turn facing the ball so you can see whether the ball has been picked up by the fielder.

This means you’ll need to practice turning both directions, with the bat in either your left hand or right hand.

So get your chest facing the ball when you turn, NOT YOUR BACK, this is called ‘Turning Blind’.

Clear communication is important for successful running between the wickets.

Loud calls help with clear communication.

REMEMBER THE CALLS:

– YES – shout this when you want to run.

– WAIT – shout this when a fielder is about to field the ball to see whether they may miss the ball or fumble it.

– NO – shout this when you don’t want to run.

Please be careful shouting ‘GO’ as this sounds like ‘NO’.

Having loud clear calls will help our communication when running between the wickets.

But we must make a decision whether we should run or not before making that call.

Good judgment results in runs.

Bad judgment results in run outs.

So how do we judge whether to run or not?

In its simplest form, judging runs is all about TIME.

It’s a race between Batter and Fielders.

As batters, we must slide our bat in past the popping crease before the stumps get hit, so we are not RUN OUT.

And fielders are trying to hit the stumps before the batter completes the run.

So it’s a race against time.

Think of it like this:

A) Time taken for Batter to complete run

VS

B) Time taken for Fielder to get ball to hit the stumps

If A is quicker than B (meaning a shorter time period), then taking the run is a good decision.

For Example:

Lets say it takes you (the batter) 3 seconds to run the full length of the pitch

And it will take the fielder 5 seconds to run and pick up the ball, and throw it in.

Is this a good run?

YES!

The batter will beat the ball back to the stumps.

The batter will take 3 seconds, and the fielder will take 5 seconds

There’s a 2 second gap for the batter to easily complete the run.

So the skill of judging runs is:

Predict how long (time) it will take a fielder to get the ball to the stumps.

REMEMBER THESE FORMULAS:

Time To Get Ball To Stumps >(MORE)> Time To Complete Run = RUN!

Time To Get Ball To Stumps <(LESS)< Time To Complete Run = DON’T RUN!

Runs are ranked by their risk:

LOW RISK: When there’s a buffer of time between completion of run and the ball hitting the stumps.

EG. Hitting the ball through a gap to a boundary fielder and running a single.

MEDIUM RISK: The time it takes to complete the run and hit the stumps is relatively equal.

EG. Hitting the ball to a boundary fielder and running the 2nd run when they have just picked up the ball.

HIGH RISK: When the fielder can gather the ball and throw to the stumps quicker than you can complete the run

EG. Hitting the ball straight to cover and running a single.

– – – – – – – – –

A COUPLE OF THINGS TO CONSIDER:

– Your running partner may not be as quick as you, so you need to take that into consideration when making a decision.

-The match situation may dictate that we have to take a HIGH RISK run, but fielders may fumble/miss the stumps.

– One batter is usually running to the ‘DANGER END’ – the end closest to the where the ball is – act accordingly.

– Be aware of which fielders are quick across the ground, or who have a strong throwing arm, as they will take a shorter amount of time to get the ball back to the stumps.

– Try to observe which arm (Left/Right) the fielders throw with, as if running to their strong side they will be quicker than running to weaker side.

The line of the ball is the direction the ball is going in compared to the batter’s stumps.

So whichever stump the ball is going towards, this is the line of the ball (Eg. Middle stump line).

Understanding the line of the ball is important as a:

– Bowler – gives you a target and helps build a plan (Eg. Bowl at off stump)
– Batter – helps you determine what shot you are going to play (Eg. Hit middle stump line straight down the ground).

There are 3 physical stumps:

– Off Stump
– Middle Stump
– Leg Stump

We can see from the image below that Off stump and Leg stump swap over for a right-handed and left-handed batter.

TIP TO HELP KNOW WHICH STUMP IS WHICH:

Start with middle stump, then look where the batter’s BACK is facing, this tells you which side LEG STUMP is on.
Or, look at where the batter’s CHEST is facing, this tells you which side OFF STUMP is on.

Legend – Off Stump (GREEN) | Middle Stump – (BLUE) | Leg Stump – (BLACK)

So we have our 3 physical stumps, these are easy to see.

It’s a little harder when the ball is wider than off stump, as we make imaginary stumps.

We imagine there is another set of 3 stumps next to OFF stump.

These imaginary stumps are called:

– 4th Stump(YELLOW)
– 5th Stump (WHITE)
– 6th Stump (RED)

This image shows the lines for a RIGHT-HANDED batter, it would be a mirror image for a LEFT-HANDED batter.

The lines don’t stop at the height of the stumps.

It’s important to note that the ball can be on ‘an off/middle/leg stump line’, but still be going over the stumps.

We can also group some lines together:

– 4th | 5th | 6th stumps – ‘Wide of off stump’
– 4th | Off | Middle – ‘Straight’
– Off | Middle | Leg – ‘Hit the stumps’

The length of the ball is where the ball bounces on the pitch compared to the batter.

This determines two things:

1) The height of the ball when it reaches the batter.
2) The amount of time the batter has to react after the bounce

Understanding the length of the ball is important as a:

– Bowler – helps build a plan (Eg. Which length to I have to bowl to make the batter play a front foot drive)
– Batter – helps you determine whether to play a front-foot or back-foot shot (Eg. Play a pull shot to a short ball)

There are 4 main lengths:

Yorker
– Bounce: Toes of batter | Height: Base of stumps

Full
– Bounce: Close to the batter | Height: Knee and below

Good
– Bounce: Between Full & Short | Height: Top of the stumps

Short
– Bounce: Far away from batter | Height: Above stumps

SHORT – YELLOW | GOOD – LIGHT BLUE | FULL – RED | YORKER – DARK BLUE

We can see that the different length zones move further away from the batter (towards the bowler’s end).

If a ball bounces FULL, this gives the batter a chance to step out and play a drive.

This means they hit the ball on the half volley (as soon as it bounces – think dropkick in rugby).

This is easy for the batter because the ball doesn’t have any time to move or slow down before being hit.

So you have less chance of the batter playing a false shot.

Alternatively, if the ball bounces SHORT, this gives the batter more time to react to the ball after the bounce.

So as a bowler, we want to minimise the time the batter has to react after the bounce.

But not bowl too full that the batter can hit the ball as soon as it bounces.

This is why a ‘Good Length’ is so desirable as a bowler.

The batter doesn’t have much time to react to the ball after it bounces.

Nor, can they hit the ball as soon as it bounces.

And the ball is threatening the stumps!

Just like the above beauty by Jofra Archer – we can see it hits the top of off stump (and goes for 6!).

It’s important to note that the length zones can change because of various factors (Eg. Pitch conditions, height of bowler/batter).

We will cover more advanced topics about ‘length’ in future levels.

Cricket has an amazing dynamic compared to other team sports.

It’s a game that consists of individual battles wrapped up in a team war.

The team have a shared common goal of winning the game.

But every ball there is a battle between batter and bowler.

So there’s plenty of opportunity for individual success.

The majority of the time, outstanding individual performances will win games for the team.

But the most successful teams are more than just individuals.

Even though there is a one-on-one duel between batter and bowler.

The fielders play a huge supporting role.

And the two batters at the crease must work together as they are outnumbered.

Good teams have a couple of key characteristics:

– they enjoy each others successes

– they set high standards and take responsibility when they are not met

– all individuals have a clear understanding of how they contribute to the team winning

– they communicate well between each other to solve problems

– they embrace challenges and stand up when the going gets tough.

– they are playing for something bigger than themselves.

– they trust each other to have done the practice to succeed in the game

Ways you can help out your other team members:

– support the batters from the sideline as it’s 2 vs 11 out on the field

– get a higher order batter on strike if they are batting well

– think about team success rather than individual milestones

– back up each other’s throws so there’s no overthrows

– support a teammate after they drop a catch / get a duck / don’t bowl as well as they’d like

– ensure you’ve practiced and are focused when playing, to not make mistakes (eg drop a catch)

– if you don’t get any runs or don’t bowl well, you make sure you contribute in another way (Eg. Support your teammates, save runs in the field with diving stops, get a run out, take an epic catch).

In summary:

– Individual performance is important but you need the team

– Always think how can you best help the team in any given situation

– Trust is what builds teams, trust in preparation, trust in performance

– You will fail many times as a cricketer, so enjoy the success of others as it helps the team win.

When playing limited overs cricket there are only a specific amount of balls that can be bowled.

Eg. In a T20 game, we have 120 balls (6 balls per over x 20 overs = 120 balls).

So batters don’t want to waste any balls that they could score runs off.

And bowlers want batters to waste as many balls as possible.

This is the battle between bat and ball.

Batters want to score runs, and bowlers want to take wickets & not get hit for runs.

So, a DOT BALL is when no runs are scored off the ball.

There’s no extras (wides, no-balls, byes, leg-byes), or no runs off the bat.

The more dot balls that occur, the less balls there are remaining in the game for batters to try and score off.

As batters, we must accept that we won’t score off every ball we face.

Even the great AB De Villiers didn’t score off 43.7% of the balls he faced.

The bowler can bowl a good ball we have to defend.

It may be the start of our innings and we need to get our eye in, and adjust to the conditions.

We can hit a cracking shot, straight to a fielder.

The skill then, is maximising how many runs we can score off the non-dot balls, to make up for the dot balls.

And as bowlers, we must accept that we won’t always take wickets or bowl dot balls.

We may been bowling at the end of the innings with boundary fielders, and the batters are swinging hard.

Batters may get lucky edging the ball into gaps for runs.

Or the batter is just really good at hitting the ball into gaps.

So the skill is how we minimise the amount of runs we get hit for off the non-dot balls.

Dot Balls can:

– put pressure on batters as they are not scoring runs and could lead to their wicket

– increase the required run rate if chasing down a total

– result in a lower total being scored as balls are wasted

So the game is:

– Batters minimise dot balls

– Bowlers/fielders maximise dot balls

Bowling

Where you bowl to the batter generally determines where they can hit the ball on the field.

So if you know where you are going to bowl in relation to the batter’s body.

We have a good idea where the batter is going to hit the ball.

This allows us to position the field easier.

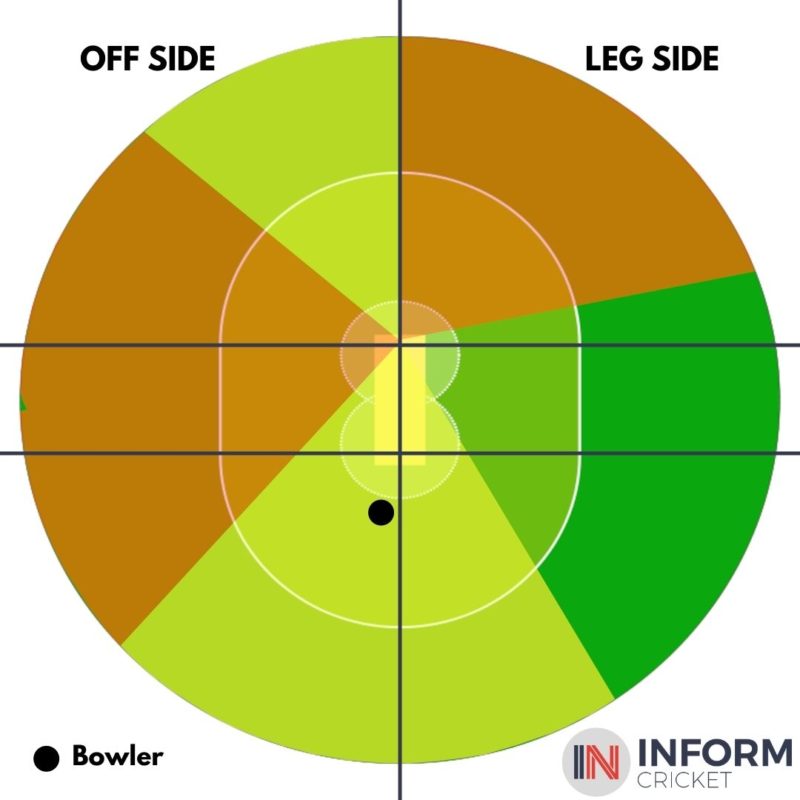
Look at this diagram below…

You can see we have drawn a 3 x 3 grid.

The 3 vertical sections represent the height of the ball (length/bounce).

And the horizontal sections represent the direction (line) of the ball.

Remember, these grids are set for when the ball reaches the batter.

So let’s break down each section, and see where the batter may hit each ball.

Each section will be broken down into the type of ball that is bowled.

And where the batter is likely to hit the ball on the field.

Legend:
GREEN = high chance of ball being hit there
YELLOW= medium chance of ball being hit there
RED = low chance of ball being hit there.

Section: Top Left (Short and Wide)

Height = Chest and above
Length = Short

Direction = Wide of body
Line = 5th Stump and wider

High Chance of hitting the ball down to third man, or through the point/cover region.

Medium Chance of hitting the ball towards extra cover, straight or through mid wicket with a horizontal bat.

Low Chance of hitting the ball down to fine leg or around to square leg.

Section: Middle Left (Good Length but Wide)

Height = Top of pad to chest
Length = Good to Short

Direction = Wide of body
Line = 5th Stump and wider

High Chance of hitting the ball down to third man, or through the point/cover region. As well as hitting a baseball hit through mid wicket.

Medium Chance of hitting the ball towards extra cover & straight.

Low Chance of hitting the ball down to fine leg or around to square leg.

Section: Lower Left (Full and Wide)

Height = Top of pad to ground
Length = Good to Full

Direction = Wide of body
Line = 5th Stump and wider

High Chance of hitting the ball down to third man, all the way around to mid on.

Medium Chance of hitting the ball towards mid wicket.

Low Chance of hitting the ball down to fine leg or around to square leg.

Section: Top Centre (Short and Straight)

Height = Chest and above
Length = Short

Direction = At head/chest
Line = Straight (4th/Off/Middle Stump)

High Chance of hitting the ball from fine leg to mid wicket.

Medium Chance of hitting the ball past the keeper.

Low Chance of hitting the ball from third man to mid wicket.

Section: Middle Centre (Good length and Straight)

Height = Top of pad to chest
Length = Good to Short

Direction = Inline with body
Line = Straight (4th/Off/Middle Stump)

High Chance of hitting the ball to the leg side from square leg to mid on with either a vertical or horizontal bat.

Medium Chance of getting the ball down to third man, or hitting the ball straight down the ground with a vertical bat.

Low Chance of hitting the ball through cover point/cover region, as well as down to fine leg.

Section: Low Centre (Full and Straight)

Height = Top of pad to ground
Length = Good to Full

Direction = Just wide of legs
Line = Straight (4th/Off/Middle Stump)

High Chance of hitting the ball through extra cover and straight down the ground, and dragging the ball across to the leg side around to deep backward square leg.

Medium Chance of getting the ball down to third man and fine leg using a ramp/scoop. As well as playing a reverse sweep through the point region.

Low Chance of hitting the ball through point/cover region.

Section: Top Right (Short and Down Leg)

Height = Chest and above
Length = Short

Direction = At shoulder/ribs
Line = Leg stump and down leg

High Chance of hitting the ball down to fine leg and around to deep square leg.

Medium Chance of getting the ball in front of square leg and through mid wicket.

Low Chance of hitting the ball through third man all the way around to mid on.

Section: Centre Right (Good length but Down Leg)

Height = Top of pad to chest
Length = Good to Short

Direction = At body
Line = Leg stump and down leg

High Chance of hitting the ball down to fine leg and around to deep mid wicket.

Medium Chance of hitting the ball down to mid on and straight mid wicket.

Low Chance of hitting the ball through third man all the way around to straight down the ground.

Section: Low Right (Full but on legs)

Height = Top of pad to ground
Length = Good to Full

Direction = At pads
Line = Leg stump and down leg

High Chance of hitting the ball down to fine leg and around to deep mid wicket.

Medium Chance of hitting the ball down to mid on and straight mid wicket. And also to third man/point if the batter plays a reverse sweep.

Low Chance of hitting the ball through forward point/cover region and to mid off.

Remember that these hitting areas are in relation to the batter’s body when they try to hit the ball.

You could bowl the perfect ball outside off stump (to get hit to off side), and the batter moves across their stumps to make the ball in line with their body, which means they can hit the ball into the leg side easier.

This is the game.

The battle between batter and bowler, playing cat and mouse.

More on this later.

A bad plan is better then no plan at all.

Whenever we are bowling, we need to have a plan of what we are trying to achieve.

We are trying to achieve two things as bowlers:

1) Take wickets

2) Stop the batters from scoring runs

Our primary objective is to take wickets.

This naturally stops the flow of runs (as a new batter comes in and takes time to get their eye in).

We also work our way down the batting order (where the quality of batter usually decreases).

So our first thought is ‘How are we trying to get the batter out? (Eg. Bowled/LBW, Caught behind).

This then dictates where we bowl (Eg. Bowled/LBW = bowl at the stumps).

So, if we are not taking wickets, we need to then try and think, ‘How do we stop the batter from scoring runs?’

If we are bowling dot balls, this can cause batters to play a high risk attacking shot, and may lose their wicket.

The majority of the time, the plan of ‘Hit The Stumps’ works pretty well.

This means that if the batter misses the ball, then you have a high chance of taking a wicket (LBW or Bowled).

But you can also bowl outside off stump (to stop batters hitting you to leg side).

You can change your plan depending on many factors (Eg. batters weaknesses, ground dynamics, your strengths).

These will be covered in future topics.

So in summary:

When you know your objective (Eg. get batter out bowled).

You know where you want to bowl (Eg. at off stump).

We can then use our fielders in the best way to achieve that plan.

The fielders are your chess pieces in executing your bowling plan.

We must use them to our advantage to bring about a positive result for the team.

So depending on what our objective is from our bowling plan.

This impacts the field setting.

We use our fielders to:

1) Help take wickets (Eg. catch in the outfield, run out)

2) Stop runs (Eg. Diving stops, stopping singles/boundaries)

So we place the fielders where we think they would help take a wicket (Eg. a catching position).

Or, we place the fielders in a position where we think the batter is going to hit the ball (Eg. at deep square leg if they are going to play a pull shot).

Remember the main role of the fielders:

– In/ring fielders stop singles
– Boundary fielders stop boundaries

So place the fielders in accordance to the role you want them to achieve. (Eg. Mid Wicket saving the single).

So lets say the plan is ‘Bowl straight hit middle/off stump – get the batter out LBW/bowled’.

Where is the batter most likely to hit the ball?

Well, let’s look back at the ‘Where will the batter hit the ball?’ diagrams.

So we can tell that if the ball is executed well (hitting middle/off stump), the batter should hit the ball straight or to the leg side.

Then the field should be set to protect those areas (as if we leave gaps in those areas, the batters will score runs easily).

The fielders in those areas are ready to stop the ball when it comes to them.

And also catch the ball if it’s hit up into the air.

So you put more fielders in the GREEN zone than the YELLOW zone.

But put more fielders in the YELLOW zone than the RED zone.

You do need fielders in the YELLOW and RED zones in case the batter edges the ball, or the bowler misses their line and length.

As we only have 9 fielders, we can’t have a perfect spilt of fielders on the off and leg side (9 can’t be divided by 2).

So one side of the field will have more fielders on than the other.

We refer to the spilt of fielders in the formula of:

Higher number of fielders on one side : Lower number of fielders on other side : ‘Dominant Side’

Eg. 5 : 4 Leg Side – this means you’ll have 5 fielders on the leg side, and 4 on the off side.

Or, 7 : 3 Off Side – meaning you’ll have 7 fielders on the off side, and 3 on the leg side.

*Teams must have a minimum of 4 fielders on the off side, and can only have 2 fielders behind the square leg umpire.*

So in summary:

– Set your field to try to take a wicket or to save runs being scored.

– Think about where you are going to bowl to the batter, and where they are most likely to hit the ball.

– Then fill those gaps with fielders either to save a single (In/ring fielder) or to save a boundary (boundary fielder).

We can have the best plan, and it just doesn’t work on the day.

The bowler might be missing the line and length for the plan by a big margin.

Eg. Bowling Short when trying to bowl Yorkers.

Or, the batter is dealing with the original plan extremely well.

So, we must adapt in the moment and change our plan.

BOWLERS – DON’T change where you’re bowling without having the field set to compliment that new plan.

Eg. The original plan is to bowl outside off stump with a 7:3 off side field.
The bowler wants a wicket, so tries to bowl at the stumps.
But gets their line a little wrong, and gets hit through the leg side for 4 runs, as there’s only 3 fielders there.

Very frustrating – as the team had a plan (bowl outside off stump with an off side dominant field).

And the bowler went against the team plan for individual glory (trying to take wicket bowling at stumps).

If the plan isn’t working, then we change it.

There are times when the plan is working pretty well, but all is needed is a slight change of field.

Eg. The plan of bowling outside off stump is making the batter play and miss, but the batter plays a couple of drives through the cover region for four runs.

In this example, the play and misses the batter is playing is good as could bring about a wicket.

And you’re bowling dot balls.

But the boundaries are ruining the dot balls.

If you had the cover fielder saving the single, they could be dropped back to the boundary to save the four.

Now that same plan hasn’t change dramatically, but you are saving the boundary (runs) from being scored.

So in summary:

– Change the bowling plan & field when the original plan isn’t working at all.

– If the plan is working relatively well, you may have to change the field slightly to offer more protection.

Batting

Scoring runs wins games.

We either post a total batting first, that the opposition will struggle to chase down.

Or, we bat second and must chase the opposition’s total down to win.

Even though the total belongs to the team, individual batters score the runs.

So the volume of runs is very important.

But, we must also understand the rate at which we score those runs.

We look at two individual metrics to help understand this.

To understand volume of runs will look at the batters AVERAGE.

And the STRIKE RATE of the batter indicates how quickly they score their runs.

Your AVERAGE is the amount of runs you score on average in each innings you play.

We work out AVERAGE using the formula:

Total runs scored / Times dismissed (total innings – not outs) = AVERAGE

The other metric we look at is your STRIKE RATE.

This is the average amount of runs you would score for every 100 balls faced.

We work this out using the formula:

(Total runs / Balls faced) * 100 = STRIKE RATE

So we can see from Glenn Maxwell’s T20 career stats above that his AVERAGE is 30.96.

FORMULA1982 (total runs) / 64 (77 innings – 13 not outs = 64) = 30.96

On average, every time Maxwell bats in a T20 game he’ll get 30.96 runs.

We can also see from above that Maxwell’s STRIKE RATE is 154.

FORMULA1982 (total runs) / 1287 (balls faced) = (1.54)*100 = 154.

This means if he faced 100 balls, he would score 154 runs – very impressive!

Your strike rate can be worked out for a single game or across a season.

Your average can only be calculated when you are first dismissed in the season/career.

The best combo is high average and high strike rate (high volume of runs scored at a quick rate).

But that’s not always going to be achievable for players.

As it depends on the situation the batter finds themselves in.

For example:

Imagine there’s 10 balls remaining in the innings and we want maximum runs.

Do we need the batter with a strike rate of 50 or 120 facing the most amount of balls?

Of course it’s 120, as they have the better chance of scoring more runs off the 10 balls.

(10 balls remaining | 50 strike rate = 5 runs scored | 120 strike rate = 12 runs scored).

As there isn’t much time left, the average isn’t as important.

On the other hand, if we need 30 runs to win off 60 balls, do we need the batter who averages 10 or 30?

In this situation, the strike rate isn’t as important, as there are twice as many balls remaining then runs needed.

So the batter with an average of 30 is more likely to score the majority of the runs needed to win.

In summary:

– scoring runs wins games, but if we don’t score them quick enough, we lose.

– knowing which batters can score the most runs, and which can score the quickest can help inform decisions.

– always try and work out the situation of the game and adapt accordingly.

When your team bats first in a cricket game, you must set a total for the opposition to try and chase to win the game.

We are obviously trying to get the highest possible total we can within the overs we have.

This will lower the chances of the opposition being able to chase down our total.

Firstly, our team’s objective is to bat the full allocation of overs. (Eg. A T20 game – batting the full 20 overs – 120 balls).

If our team loses 10 wickets before the full overs are used, we are missing out on potential runs to be scored.

But, we don’t want to just defend the ball (not playing attacking shots) the whole time and finish our overs without losing many wickets.

We will be short of the total we could have got if we batted more aggressively.

Meaning the opposition can chase down the lower total easier.

So the skill is to find the balance between the two (and read the game situation).

We try and achieve two things:

1) If batters are ‘set’ (have been batting for a while and scoring freely), they try to up the scoring rate without losing their wicket (as they are most use to the conditions/bowlers, and have their eye in, rather than a new batter).

2) Keep ‘wickets in hand’ (batters ready to come in) for the final few overs, so the team can bat aggressively without worrying about being bowled out.

A good general rule is ‘Start batting really aggressively when the wickets in hand matches the overs remaining’

Eg. You’re playing a T20 game, and your team is 100/3 off 13 overs. Batters start trying to up the scoring rate. (Because there’s 7 wickets remaining out of 10, and 7 overs remaining).

We don’t aways bat first.

We either set a total to be chased, or we need to try and chase the opposition’s total down to win the game.

So if your team is chasing, in simple terms:

– Score the runs needed
– Without losing 10 wickets
– Or running out of overs.

In a limited overs game (Eg. a T20 game) you have a specific amount of balls to get the runs you need to win.

If you’ve ever watched a game on TV, you’ll see a graphic at the bottom that reads something like:

’22 runs needed off 10 balls’.

When we start a run chase, the best way to get a basic understanding of how to approach it, is to work out the required run rate.

There is a simple formula to help work it out:

total runs required / overs remaining = runs required per over

Eg. Your team is chasing 100 runs off 20 overs – 100/20 = 5 runs per over.

This means that if you scored 5 runs off every over, you would win the game.

The run rate will adjust depending on how the game is going.

Eg. Your team scores 30 runs off 10 overs (chasing 100 runs off 20 overs), now the required run rate is 7 runs per over (70/10 = 7) as you need 70 runs off the remaining 10 overs to win.

If you know the required run rate, this can help you make decisions in the moment.

You may need to try and take a risk to hit a boundary if you need 6+ runs an over.

Vice versa, if you only need 3 runs per over, you can take lower risk options and score singles, without losing wickets.

It’s very important to note that 2 things really impact the required run rate.

These are DOT BALLS, and WICKETS.

Dot balls are when no runs are scored (therefore causing the required run rate to rise).

And wickets usually cause a rise in the required run rate as it takes the new batter some time to get their eye in and adjust to the batting conditions.

Don’t worry if you have an over where you don’t reach the required run rate, as you can always get a big over that causes the rate to come down.

We spend years practicing to hit the ball with the bat.

But sometimes we don’t even need to hit the ball

You should only hit the ball for 3 reasons:

– To score runs
– To protect your stumps
– To protect your body

If you are not trying to achieve one of those 3 things, then think whether the ball is worth trying to hit.

This could mean that a ball that isn’t threatening the stumps or your body (Eg. outside off stump), which lands on a good length (meaning it will be hard to drive, or play back to), could be left alone to the wicket keeper.

Batter’s usually do this more at the start of the innings to help them get their eye in, as well as leave balls they could potentially edge to the wicket keeper or slips behind.

It may be that the game situation dictates that you can’t leave the ball (Eg. 2 runs off 1 ball), so make sure you weigh that up first.

You can have the best technique in the world, but if you don’t have a plan on how to score runs, then it’s hard to excel.

To strip back the plan of batting we can summarise it simply to – Defend the good balls. Attack the bad balls.

If a bowler bowls a good ball threatening the stumps, where you can’t play an attacking shot to score runs, then we must protect our stumps and defend the ball.

If the bowler misses their mark (Eg. bowls full – easy to drive, or short – easy to pull/cut) then we must make them pay by scoring runs.

If we don’t attack their bad balls (meaning there’s no pressure on them), then we will end up having to attack their good balls, because the pressure builds on us to score.

This usually results in a big swing across the line to leg side, which may end luckily with runs, but more times than not, ends in chipping a catch up, or missing the ball completely, and getting bowled.

Remember, we score runs by hitting the ball into gaps between fielders.

There’s a famous coaching quote – Ones. Twos. Hit the bad ball.

Start thinking about where you are going to score your runs.

Eg. If the bowler bowls wide outside off stump, then I’m going to hit that gap between point and cover.

Or, if the bowler bowls towards my body, I’m going to hit the ball into that gap between deep square leg and mid wicket.

Having a plan gives you clarity. This means you don’t think about technique. Therefore you can focus on the task at hand.

The stumps play an important role in batting.

We want to protect them.

So it makes sense to know where they are in relation to our head.

The first thing we do when arriving at the crease is to ‘ask for our guard’ from the umpire.

Hold your bat up vertically like this:

Then politely you can ask for:

– Leg Stump (also known as ‘one’)
– Middle and Leg Stump (also known as ‘two’)
– Middle/Centre Stump
– Off Stump

Eg. Can I have middle please, umpire?

The umpire will direct you which way you need to move your bat in order to line up with your preferred guard.

You need to then make a line/mark in order to know where to place your feet in your setup.

This line can be made with your spikes, the side of your shoe or your bat.

You now have ‘your guard’.

The main role of ‘your guard’ is to ensure you know where you are standing compared to the stumps.

A great starting point is taking a Middle Stump Guard.

This keeps it very simple.

If the ball is inline with your head – it will be hitting the stumps.

– You play straight.

If the ball is off side of your head – it will be missing the stumps.

– You play an off side shot.

If the ball is leg side of your head – it will be missing the stumps.

– You play a leg side shot.

This is very basic, but a good starting point.

You can adjust your guard to achieve different things.

Which we will cover in the higher levels.

Getting the right batting order can help the team win games.

All batters are bred differently.

Some are more conservative and don’t take many risks.

Others are naturally more aggressive and chance their luck.

We all have different strengths and weaknesses.

In a perfect world, we would have a batting order that covers all situations we might find ourselves in.

Eg. a mix of left & right handers who can both attack or consolidate if needed.

Generally we try to give our best batters the opportunity to bat for the longest time.

A typical batting order consists of:

– Openers (number 1 & 2)
– Top Order Batters (number 3-5)
– Middle Order Batters (numbers 6-8)
– Tailenders (numbers 9-11)

The openers main priority is to get the team off to a solid start.

This means – ‘put runs on the scoreboard to settle the nerves without losing early wickets’.

The openers will more than likely have to face the opposition’s best bowlers.

And they will be be facing the new ball which may swing/move off the seam.

But, usually there’ll be more gaps and less boundary fielders to start the innings.

So there’ll be opportunities to score.

Opener’s need to have a strong defence, the ability to rotate strike, and punish bad balls.

Setting a good ‘platform’ for the team helps batters coming in to bat more aggressively.

If the openers get off to a good start, then the Top Order batters can come in against an older ball (less swing/seam movement).

Teams usually have their best batters in at number 3, 4 & 5 (Think Williamson, Root, Kohli, Smith, Azam).

They can bat for a long period of time, and also can help consolidate if there are early wickets.

Numbers 6/7/8 are usually the team’s all rounders and big hitting finishers.

Think Stoinis, Dre Russ, Livingstone.

The majority of the fielders are usually on the boundary in the death (last) overs.

So, we need batters who can hit boundaries and score quickly.

The Lower Order batters or ‘Tailenders’ make up numbers 9, 10 and 11. (Think Anderson, Broad, Chris Martin, Monty Panesar).

These positions are usually bowlers who are in the team to win games with the ball, rather than the bat.

But there are times when the ‘tail’ is needed.

If a tailender is batting with a Top or Middle Order batter, then they must try and stay in and support the other batter.

This allows the higher order batter to potentially get more runs by facing more balls.

If the tailenders are batting together, they must try to get some runs to help the score and frustrate the opposition.

This is referred to the tail ‘wagging’.

Opposition always hate this as they expect to take the wickets of tailenders easily.

So in summary:

– try to match the style of the batter with the position they bat
– the best batters should have the chance to bat for the longest time (to score the most runs)
– get your most aggressive batters in at the end of the innings (to hit boundaries)
– always read the situation of the game (can we attack or do we need to consolidate?)

Assessment